Key Takeaways
- A three-point lighting setup is the single most reliable foundation for professional studio portraits — master it before investing in anything else.
- Strobes deliver more consistent exposure, faster recycling and crisper motion-freeze than continuous LEDs at equivalent price points — making them the smart first buy for a studio space.
- Colour Rendering Index (CRI) directly affects skin tone accuracy; always choose key lights rated CRI 90 or above to save yourself hours of colour correction in post.
Why Studio Lighting Equipment Separates Good Photos from Great Ones
Technical correctness is the floor, not the ceiling. An image that's correctly exposed under poor lighting still looks flat — skin tones appear muddy, shadows fall in unflattering places and the subject looks like they were photographed in a waiting room. Studio lighting equipment lets you sculpt light intentionally. You decide where highlights sit, how deep shadows fall, whether a subject looks lifted off the background or swallowed by it. That control is what distinguishes professional portraiture from technically competent snapshots. The good news: achieving it doesn't require a Hollywood budget. It requires understanding which gear matters, why it matters and in what order to buy it.The Stakes for Different Genres
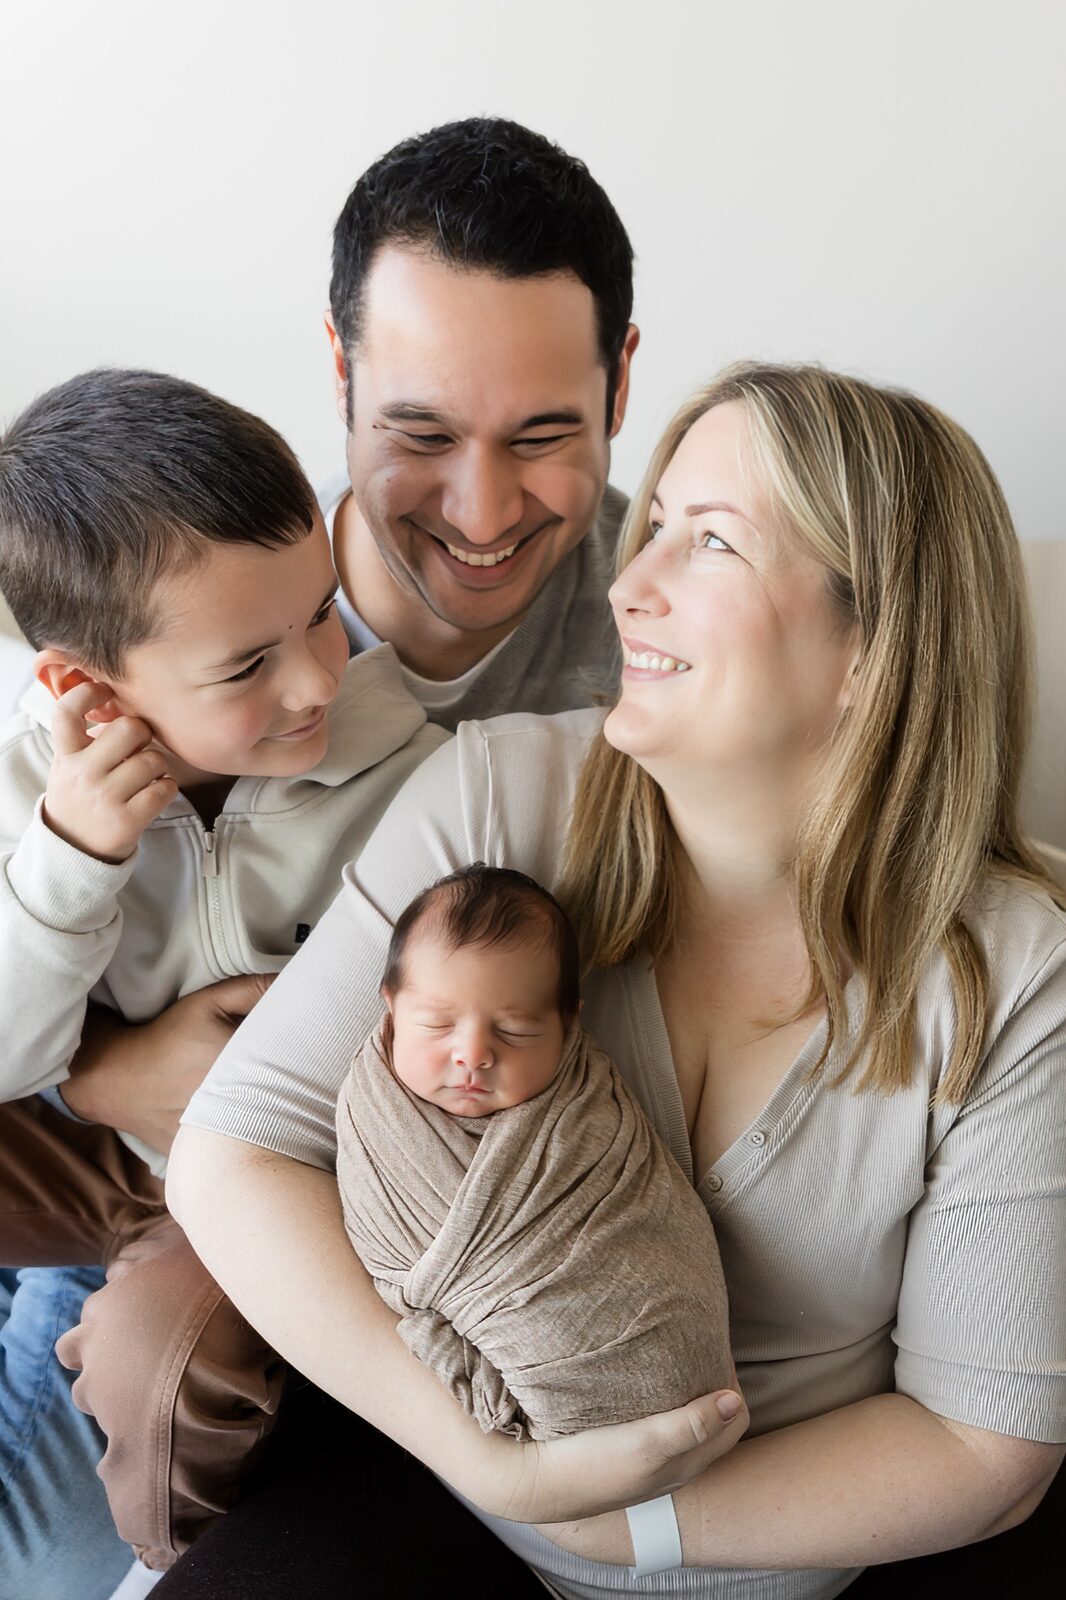
Different session types demand different lighting priorities:- Newborn photography — soft, even, shadow-minimising light that keeps tiny subjects comfortable and skin tones accurate.
- Family portraits — flexible setups that handle multiple subjects across a frame without uneven fall-off.
- Corporate headshots — consistent, repeatable output across large volumes of subjects in a single session.
- Cake smash sessions — bright, punchy light that keeps up with fast-moving one-year-olds and vivid splashes of colour.
The Three-Point Lighting Setup: A Pro Studio Standard
The three-point lighting setup has survived decades of commercial and portrait photography because it works. Reliably, consistently and across almost every subject type. Every pro-grade photo space should be built around it. Here's how each element functions:Key Light
Your key light is the primary source — the light doing the most work. Position it approximately 45 degrees off-axis from the subject, at a height just above eye level, roughly one to 1.2 metres from the face. That angle sculpts cheekbones, defines jawlines and creates the natural-looking shadow depth that separates a portrait from a passport photo.Fill Light
The fill light sits on the opposite side, set to roughly half the output of the key. Its job is to reduce contrast and reveal shadow detail without flattening the face entirely. The moment a fill light outpowers the key, your subject starts to look like they're being interrogated — so keep it modest.Rim or Hair Light
Placed behind and slightly above the subject, the rim light separates them from the background and adds a sense of three-dimensional depth to the image. Without it, subjects can appear to merge into backdrops — particularly on darker-toned setups. This light is optional in budget builds but makes an immediately visible difference. Three lights. Simple, intentional, repeatable. You'll look competent, not lucky. ---Strobes vs Continuous Lights: Which Wins for a Studio Build?
This is where ideals hit invoices — and where a lot of photographers make their first expensive mistake. Strobes (monolights or pack-and-head systems) win in dedicated studio environments for three reasons: raw output, fast recycling and motion-freeze capability. A 400-watt-second monolight will overpower ambient light indoors completely — which means predictable, consistent exposure regardless of what's happening in the room around you. Recycle times typically sit between 0.1 and 0.5 seconds at full power, so high-volume sessions move smoothly. Continuous LEDs have their place — video hybrid work, behind-the-scenes content creation — but they come with trade-offs. In a bright studio environment, you'll need 300-watt-class panels (think Godox SL300III territory) to maintain subject separation from ambient light, and then you're managing heat, power draw and subject comfort simultaneously.Budget Guidance for Strobes
- Entry level: Two used 400Ws monolights with wireless triggers — expect to spend $600–$900 AUD for the pair in reasonable condition.
- Mid-range: New Godox AD400Pro or equivalent — $700–$1,000 AUD each, excellent build quality and TTL compatibility.
- Professional: Broncolor or Profoto systems — $2,500 AUD+ per head, justified for commercial studios with high-volume demand.
"The photographers who produce consistent results session after session aren't necessarily using the most expensive gear — they're using gear they understand completely, set up the same way every time."---
Colour Temperature and CRI: The Details That Determine Skin Tone
Get colour temperature wrong and skin tones go strange in ways that are genuinely difficult to fix in post — grey, orange, or that sickly greenish cast that no preset quite corrects. Get it right and your RAW files look nearly finished straight out of the camera. Daylight-balanced strobes sit at approximately 5,500K. Tungsten hotlights land around 3,200K. Mix them in the same setup and you'll be chasing colour casts in Lightroom like it's a second job. The rule is simple: choose one colour temperature for all your sources and set your camera's white balance to match.Understanding CRI and Why It Matters
Colour Rendering Index (CRI) measures how accurately a light source renders colours compared to natural daylight. The scale runs from 0 to 100. A score of 100 is reference sunlight. Most professional strobes score 95+. Cheap RGB LED rings frequently score below 80 — meaning what you see through the viewfinder doesn't represent what the camera actually captures, and skin tones bear the brunt of that inaccuracy. Key lights with CRI 90 or above are non-negotiable for portrait work. The difference is immediately visible: a subject under cheap RGB light looks flat or sallow; the same subject under quality daylight-balanced strobes looks alive. That investment pays dividends on every single shoot. ---Essential Light Modifiers: Softboxes, Umbrellas and Reflectors
Modifiers shape and control how light exits your source and lands on your subject. They're not optional extras — they're what converts a bare, harsh strobe into the soft, wrapping light that makes portraits feel polished.Softboxes: Control Over Direction
A softbox gives you discipline. You decide where light kisses the face and where it fades into shadow. A 48-inch octabox used as a key light produces a large, flattering wrap that makes skin look luxurious without requiring heavy retouching.Umbrellas: Generous but Uncontrolled
Umbrellas spread light generously — sometimes too generously. They're forgiving and quick to set up, but spill light easily ruins backdrop separation and muddies subject edges. In a dedicated studio, softboxes outperform umbrellas consistently.Reflectors: The Budget Fill Solution
A 40-inch silver or white reflector opposite your key light can serve as a passive fill source — no second flash head required. Silver reflects more light than white and adds a touch of contrast; white is softer and more flattering in close-up work. A single softbox plus one reflector can genuinely replace a two-head setup for solo portrait work. Avoid bottom-shelf modifiers with uneven diffusion panels or wobbly speed rings — they introduce the exact inconsistency you're trying to eliminate. ---How to Build Your Pro-Grade Studio Space: Step by Step
Building a functional studio doesn't happen in one afternoon or one shopping cart. Here's a logical sequence that gets you shooting quality work at each stage without waiting until you can afford everything at once.- Define your primary genre. Are you shooting newborn photography, family sessions, corporate headshots or something else? Your genre drives every gear decision that follows.
- Source your key light first. One quality 400Ws monolight with a 48-inch octabox will immediately transform your images. Shoot with this alone for several sessions until you understand how it behaves in your space.
- Add a reflector. Position it opposite the key to control contrast. This is cheap, immediate and highly effective.
- Invest in wireless triggers. Manual triggering creates inconsistency. A reliable trigger system (Godox X2T or equivalent) costs under $100 AUD and removes one variable entirely.
- Add a fill light or hair light. Once your key-light work is solid, a second monolight opens up more creative control. Start with a hair light — it has the most visible impact on image depth.
- Refine your backdrop system. Seamless paper, muslin and vinyl backdrops each suit different aesthetics. Build a collection gradually rather than buying everything at once.
- Calibrate colour regularly. A grey card or colour checker used at the start of each session saves significant post-processing time and keeps your output consistent across months.
Ready to experience a truly professional studio environment?
Faithful Photography's studios in Glen Alpine and Gledswood Hills are purpose-built for quality — every lighting setup refined through thousands of sessions across South-West Sydney.
How Faithful Photography Applies These Principles in Our Studios
Understanding the theory is one thing. Seeing it applied in a dedicated, refined studio space is another. Faithful Photography operates out of two purpose-built studios — one in Glen Alpine and one in Gledswood Hills — serving families, newborns, expectant mothers and businesses across the Macarthur region. Every lighting setup in both locations has been refined through thousands of sessions with real families, newborns and corporate clients in Campbelltown, Camden, Narellan and the surrounding area. Our newborn photography sessions use specifically designed soft, diffused lighting that wraps gently around tiny subjects without creating harsh contrast or uncomfortable glare. Our corporate headshot setups prioritise the consistent, repeatable results that high-volume sessions require. And our family portrait sessions use flexible configurations that flatter subjects of every age and colouring in the same frame. If you'd like to see what a genuinely professional studio environment produces — and experience the difference that intentional, well-calibrated studio lighting equipment makes to your portraits — our studios are ready for you. Explore our cake smash studio setup guide for a look at how we approach themed session lighting, or browse our family portrait wardrobe tips for advice on coordinating your session look before you arrive. ---Frequently Asked Questions
What lighting equipment do I actually need to start a home studio?
At minimum: one quality monolight strobe (400Ws), a 48-inch octabox, a wireless trigger and a 40-inch reflector. This four-piece kit will outperform setups three times its cost if used with care and understanding. Add a second monolight for a rim or fill light once you've mastered the key-light fundamentals.
Are continuous LED lights good enough for portrait photography?
Continuous LEDs are convenient and work well for video or behind-the-scenes content, but for still portrait work in a studio environment, strobes consistently outperform them at equivalent price points. You'll need significantly higher wattage LEDs to match strobe output, and heat management becomes a real consideration. For most portrait photographers, strobes are the better investment.
Why does CRI matter for skin tones, and what rating should I look for?
CRI (Colour Rendering Index) measures how accurately a light source renders colours compared to natural daylight. Lights below 80 CRI produce skin tones that appear muddy, sallow or unnatural and are difficult to correct in post-production without significant effort. For portrait work, always choose lights rated CRI 90 or above — professional strobes and quality continuous LEDs typically achieve 95+. The difference in skin tone accuracy is immediately visible.
Should I use a softbox or an umbrella as my key light modifier?
For studio portrait work, a softbox is almost always the better choice. Softboxes direct and contain light with precision — you control where it falls and where it doesn't. Umbrellas spread light broadly and are quick to set up, but they spill into the background and reduce subject separation. A large octabox (48 inches or more) as a key light produces exceptionally flattering, wrap-around light that suits portrait work across every genre.
How does Faithful Photography's studio lighting compare to a home setup?
Faithful Photography's studios in Glen Alpine and Gledswood Hills use professional-grade strobe systems calibrated for consistent results across newborn, family, maternity, cake smash and corporate sessions. Unlike a home setup that's being built and refined over time, our studios have been optimised through thousands of real sessions — every modifier, power ratio and colour temperature setting has been tested and validated. Clients benefit from that refinement immediately, with no need to factor in setup variables or trial-and-error lighting decisions.
What's the right colour temperature setting for studio strobe photography?
Daylight-balanced strobes output at approximately 5,500K. Set your camera's white balance to match — either by setting a custom Kelvin value of 5,500–5,600K or by using the Daylight preset. The critical rule is consistency: all light sources in your setup should share the same colour temperature. Mixing daylight-balanced and tungsten sources in the same frame creates colour casts that are notoriously difficult to remove cleanly in post-processing.
Visit Faithful Photography Today
Experience the difference that purpose-built, professionally calibrated studio lighting makes to your portraits. Our studios in Glen Alpine and Gledswood Hills are ready to welcome families, newborns, expectant mothers and businesses across South-West Sydney and the Macarthur region — from Campbelltown and Camden through to Narellan, Gregory Hills and beyond.