Key Takeaways
- Light is everything — soft, directional natural or artificial light separates a drool-worthy chocolate cake photo from a forgettable one.
- Styling is strategy — clean backgrounds, intentional props and off-centre composition turn a slice of cake into a visual headline.
- Camera technique seals the deal — the right aperture, angle and post-processing choices reveal texture and depth that make viewers stop mid-scroll.
How to Light Your Chocolate Cake Shot the Right Way
Lighting is not a detail you sort out after the fact. It is the single decision that determines whether your chocolate looks rich, textured and irresistible or flat and forgettable. Get this right first; everything else follows.Start With Natural Window Light
Natural window light is your launch pad — not a consolation prize. Position the cake near a north-facing or well-diffused window where light arrives soft, indirect and brutally honest about texture. Place a sheer white curtain or a dedicated diffusion panel between the glass and the cake and you get even illumination that flatters frosting sheen and teases out crumb detail without blown-out highlights. The job of your light source is consistency: soft, revealing, and reading every ridge of buttercream like a good headline reads a reader. Don't fight the light — let it do the heavy lifting.Observe How Light Shifts Throughout the Day
Time is an underrated prop. Light's personality shifts hour by hour in intensity, angle, and colour temperature.- Morning light from the east is cool and crisp — almost clinical. Great for clean, editorial chocolate cake shots.
- Late-afternoon light from the west warms everything up and suddenly your chocolate looks decadent rather than dull.
- Learn the rhythms of your specific space before you schedule the shoot.
Side Light Versus Backlighting: Know the Difference
Side light and backlighting are not interchangeable. They tell entirely different stories. Side light sculpts. It brings out frosting texture, separates visible layers, and gives the image genuine depth. Backlighting outlines. Position the cake between the diffuser and the camera and you get a glowing edge light that makes slices luminous, glazes sing, and backgrounds fall away naturally. Try both on the same cake. Side light for intimacy and texture; backlight for drama and shine. Pick the emotion you want to sell — then commit.Build a Budget-Friendly Artificial Setup
You don't need a rental bill that reads like a mortgage. For those shooting indoors or in controlled environments, here's a simple starting point:- Start with continuous LED panels — affordable, immediate feedback, and you can see exactly how the light behaves before pressing the shutter.
- Add a white foam-core fill board opposite the main light source to soften shadows.
- Introduce a second, dimmer panel at roughly 45° behind the cake for a subtle backlight accent.
- Strobes come later if you need them — most sync at around 1/200th, which simplifies exposure in a controlled room.
Styling Your Chocolate Cake for the Camera
Styling is not decoration for decoration's sake. Every element in the frame is either helping or hurting. There is no neutral.Strip Away Distractions First
Start by removing everything that isn't the cake — literally. Neutral, simple backgrounds — white, soft grey, natural timber — give the cake centre stage. A busy tablecloth or heavily patterned surface fractures the viewer's eye; a clean plate and uncluttered surface keep all attention on frosting texture and glaze. This isn't minimalism for its own sake. It is tactical. When you introduce props later, they land harder because the cake already owns the frame.Choose Plates and Surfaces With Purpose
Plates matter more than backdrops — yes, more. A white or cream ceramic plate reads clean and classic. A dark slate or matte grey surface gives chocolate the high-contrast backdrop it deserves. Avoid glossy surfaces that reflect light and create competing highlights. When it comes to props, keep them functional:- A fork resting against a slice — not posed, just present.
- A spoon catching light on the edge of a ganache pool.
- One or two garnishes maximum: a single berry, a candied pecan, a curl of chocolate.
Position Elements Off-Centre and at Angles
Don't centre everything out of habit. Place the cake slightly off-centre — roughly on a rule-of-thirds intersection — to create visual tension that reads intentional rather than accidental. A slice angled outward from the main cake adds implied movement and invites the viewer in. Rotate the cake so an interesting detail — a drizzle, a layered cross-section, a particularly glossy section of frosting — faces the lens."The difference between a good food photo and a great one is almost always composition, not equipment. Move the subject two centimetres and take a new frame — you'll be surprised how dramatically it changes."
Camera Settings That Actually Make a Difference
Once light and styling are sorted, camera settings translate what your eyes are already sold on into an image the viewer can feel.Aperture and Depth of Field
Shoot wide open — but not recklessly so. An aperture of f/2.8 to f/4.5 is the sweet spot for chocolate cake photography. It blurs the background just enough to separate the subject without making the foreground details go soft. At f/1.8 or wider, depth of field becomes so shallow that only a sliver of the frosting will be sharp — which can look beautiful on a single flower detail but catastrophic on a full-cake overview shot. Match your aperture to your intent.Shutter Speed, ISO and Stability
- With natural light, aim for a shutter speed of at least 1/125s to eliminate camera shake — particularly if you're shooting handheld with a macro or short telephoto lens.
- Keep ISO as low as your light source allows — ideally ISO 100–400. Higher ISO introduces grain that reads as noise, not texture, on smooth buttercream surfaces.
- Use a tripod for flat-lay or overhead shots. There is no substitute.
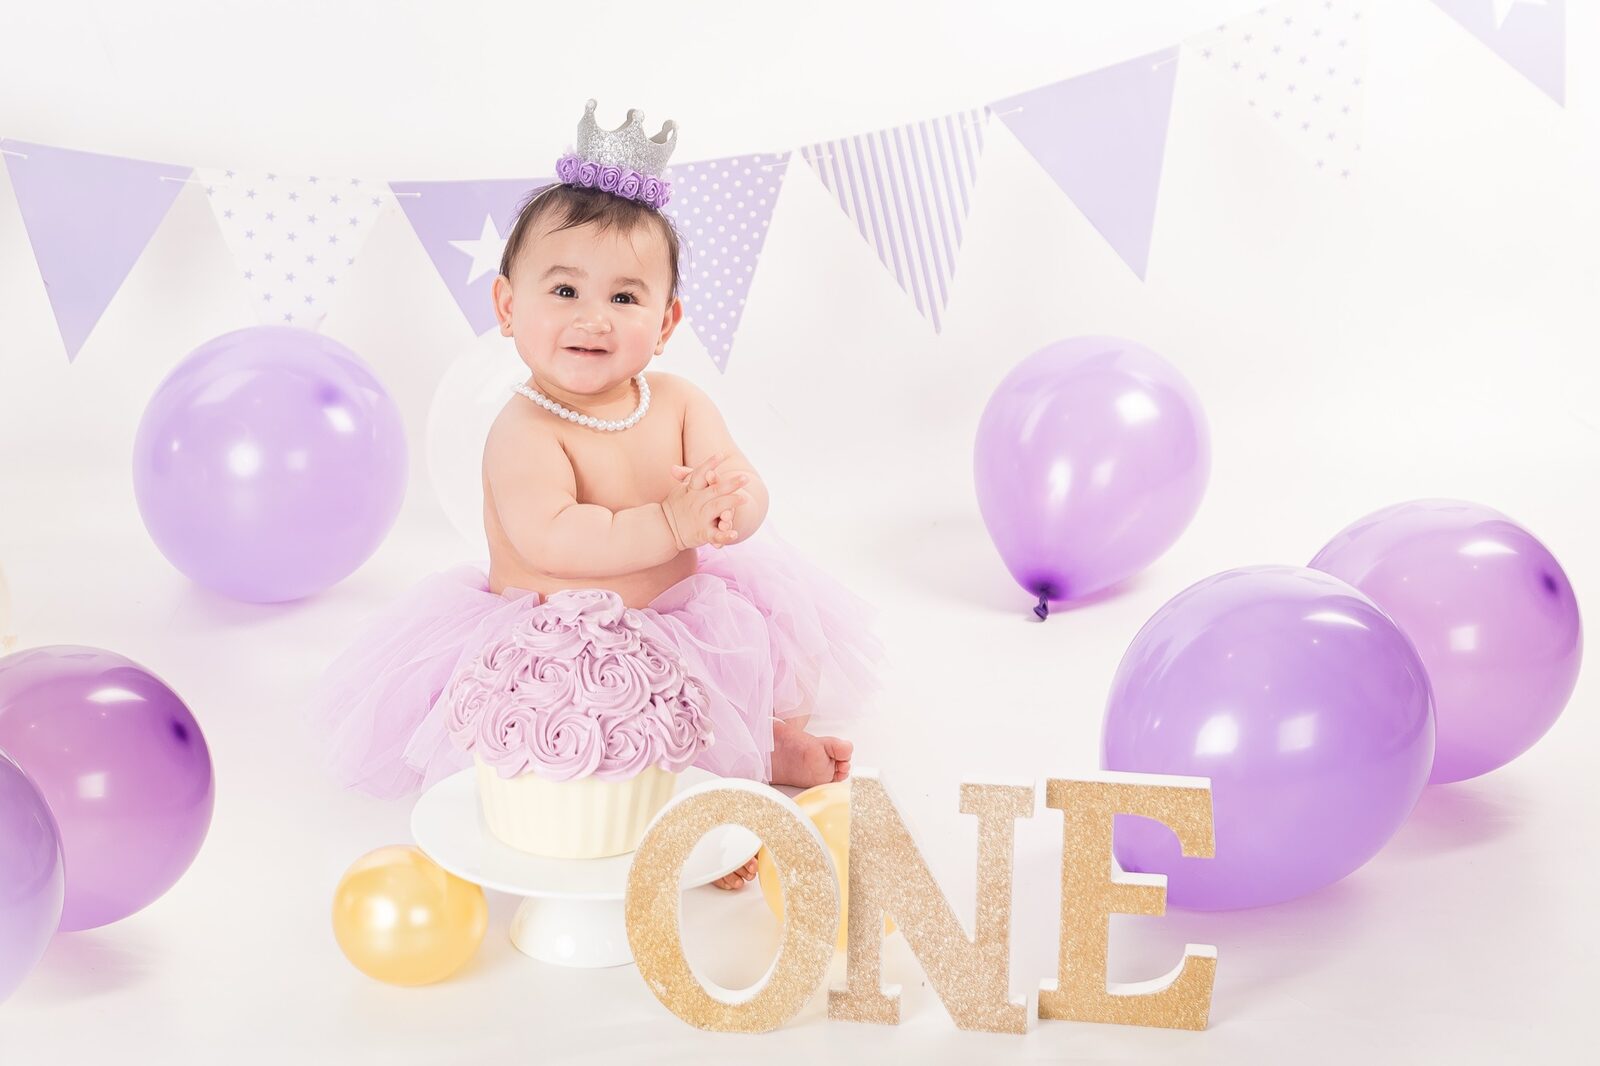
Ready to Capture a First-Birthday Moment That Lasts Forever?
Our Glen Alpine and Gledswood Hills studios are fully equipped for cake smash sessions — professional lighting, styled sets, and a team that knows how to coax the best out of both babies and chocolate cake.
Shooting Angles That Sell the Story
The angle you choose communicates the story you're telling. Defaulting to eye-level every time is the photographic equivalent of writing every sentence the same way — technically fine, deeply boring.The Three Angles Worth Knowing
- Overhead (flat-lay): Perfect for whole-cake shots, pattern-forward decorations, and toppings arranged on a surface. Requires a sturdy tripod or overhead rig and excellent overhead light.
- 45-degree angle: The workhorse of food photography. Shows both the top of the cake and the side profile — layers, drizzle, height. Most viewers process this angle as "real."
- Eye-level (straight on): Brilliant for showcasing layers in a sliced cross-section. Position the lens exactly at the height of the cake's middle layer and the image will feel immediate and intimate.
Post-Processing Chocolate Cake Photos Without Overdoing It
Post-processing is where good becomes great — and where overconfident photographers turn a beautiful shot into a cautionary tale. Chocolate in particular punishes heavy-handed edits.Colour Grading for Rich Chocolate Tones
- Increase warmth slightly — chocolate lives in the amber-brown range and a slight warm push makes it look more appetising.
- Boost shadows gently to recover detail in dark frosting rather than crushing blacks to pure darkness.
- Increase clarity or texture (not sharpness) to bring out ganache drips and crumb structure without introducing halos on smooth surfaces.
- Pull back highlights if buttercream or glaze has blown out even slightly.
What Not to Do
Avoid the impulse to pump vibrance and saturation to compensate for flat lighting. It won't fix the underlying issue — it'll just make the image look garish. If the colours feel lifeless, the problem is almost always in the lighting or styling, not the edit.How Cake Smash Sessions Teach You to Photograph Cakes Brilliantly
Here's an insight that professional photographers know: shooting cake smash photography in Sydney is one of the fastest ways to develop genuine skill with cake photography. Why? Because nothing teaches you controlled chaos quite like a one-year-old demolishing a beautifully decorated cake in real time. You learn to pre-focus, lock in your exposure, anticipate the best angles, and work with imperfect conditions — all skills that translate directly into stunning still-life chocolate cake photography as well. The studio setups we use for cake smash sessions, which you can explore in detail in our guide on cake smash studio setup and design, demonstrate exactly how professional lighting, colour-coordinated backdrops, and intentional prop placement work together to elevate a simple cake into a visual centrepiece. If you're choosing outfits or themes for an upcoming cake smash, our cake smash outfit ideas guide is worth a read too — the same colour-coordination principles apply whether you're dressing a baby or styling a cake for a still-life shoot. Families across the Macarthur region — from Campbelltown to Camden and across to Gledswood Hills — trust Faithful Photography for these milestone moments, and our approach to cake styling is baked into every session we run.Frequently Asked Questions
What is the best lighting for chocolate cake photos?
Soft, diffused natural light from a north-facing window is the gold standard for how to take amazing chocolate cake photos at home. If you're shooting with artificial lights, use continuous LED panels with a softbox or diffuser rather than a bare flash. The goal is directional but gentle illumination that reveals texture without creating harsh highlights on glossy frosting or ganache.
What camera settings should I use for cake photography?
For most chocolate cake shots, aim for an aperture between f/2.8 and f/4.5, a shutter speed of at least 1/125s (faster if you're handheld), and the lowest ISO your light allows — typically ISO 100–400. Use a tripod for overhead or flat-lay angles, and shoot in RAW format so you have full flexibility in post-processing.
How do I make a chocolate cake look more appetising in photos?
Start with a freshly prepared cake — chocolate is unforgiving of smudges and crumbs on a clean frosting surface. Style on a simple, non-competing plate or surface, remove all background distractions, and shoot immediately before the ganache or glaze begins to set or lose its sheen. In post-processing, a subtle warmth boost and gentle shadow recovery in Lightroom will make the chocolate tones pop without looking artificial.
Is a professional studio necessary to take great chocolate cake photos?
Not at all — the most important ingredient is good light, which you can find near any well-positioned window at home. That said, a professional studio gives you controlled, repeatable lighting conditions and purpose-built sets that eliminate common problems like inconsistent colour temperature or background clutter. If you're booking a cake smash session at Faithful Photography in Glen Alpine or Gledswood Hills, our studio is already fully configured for beautiful cake photography.
What backgrounds and surfaces work best for chocolate cake photography?
Neutral, matte backgrounds are almost always the right call. White and off-white give a clean, editorial feel. Natural timber or stone surfaces add warmth and texture without competing with the cake itself. Dark slate or charcoal surfaces create beautiful contrast against the brown tones of chocolate. Avoid busy patterns, bold colours, or glossy surfaces that introduce unwanted reflections.
Can I learn chocolate cake photography skills from a cake smash photo session?
Absolutely — and it's one of the most effective ways to develop real-world food photography instincts. Cake smash sessions demand fast decision-making on lighting, angles and composition under unpredictable conditions. Watching an experienced photographer work through a session at Faithful Photography — or reviewing the behind-the-scenes setup process — will teach you more in an hour than most online tutorials will in a month.
Visit Faithful Photography Today
Whether you're planning a cake smash milestone session, a family portrait shoot, or you simply want to learn from watching professionals work, Faithful Photography's studios in Glen Alpine and Gledswood Hills are ready to welcome you. Families from Campbelltown, Camden, Narellan and across South-West Sydney trust us to capture the moments that matter most.