Key Takeaways
- Soft, indirect light — whether from a window or a diffused studio strobe — is the single biggest factor in cake photos that make your desserts look amazing.
- Background, props and shooting angle work together to tell the cake's story; the wrong choice in any one of these will undercut even the best lighting.
- For first birthday cake smash shoots, a professional photographer handles every technical variable so you can focus entirely on your little one's reaction.
Why Cake Photos Live or Die by the Quality of Your Light
Every professional food and cake photographer will tell you the same thing: light quality trumps every other variable. It doesn't matter how beautiful the frosting is or how perfectly the berries are arranged if the light is harsh, flat, or the wrong colour temperature. Soft light wraps around curved surfaces, flatters piped detail, and makes buttercream look genuinely edible rather than waxy. The distinction that matters most isn't natural versus artificial — it's *soft* versus *hard*. A bare flash pointed directly at a cake creates stark shadows that erase texture and make fondant look plasticky. A large north-facing window on an overcast day produces the kind of gentle, even illumination that cake decorators dream about.Natural Light: The Gold Standard (With Caveats)
Natural light from a large window remains the benchmark for beautiful dessert photography. It gives you soft, even illumination without the colour cast that overhead bulbs love to inflict on your frosting. Direct sunlight is a different beast entirely. Harsh midday sun creates shadows that hide texture and make buttercream read as flat as pale cardboard. The fix is simple: position your cake three to six feet from a north-facing or shaded window where light is indirect and spreads across the surface like a gentle wash. If direct sun creeps in, hang a white sheer curtain — it scatters the light beautifully and prevents blown highlights on white icing. The payoff is immediate. A dreamy, even glow flatters every piped petal and makes the cake camera-ready without hours of editing.When Artificial Light Earns Its Place
Artificial light isn't a fallback — it's the reliable, punctual partner when weather and windows let you down. Place a flash or continuous light to the side and *slightly above* the cake, never directly overhead (that's a fast track to flattened dimension and deep, unflattering shadows). Add a white bounce card opposite the light source to fill dark areas and even out the frosting's highlights. For total control, use a softbox or diffuser to make your strobe behave like window light — soft, flattering, and consistent shot after shot. For studio cake smash sessions and professional food shoots on a tight schedule, controlled artificial light wins every time.Reflectors: The Secret Weapon Behind Great Dessert Photos
If there's one tool that separates good cake photos from great ones, it's a well-placed reflector. A white foam board positioned on the shadowed side of the cake bounces light back into the dark crevices so the whole subject reads with depth and dimension rather than as a flat silhouette. Want more drama? Swap the white board for a dark V-flat. Suddenly you have contrast, punch, and frosting that announces itself boldly. Distance matters too — a closer reflector gives stronger fill, while moving it back creates subtlety and mood. Reflectors work equally well with window light or flash, and a sheet of foam core from the newsagency costs almost nothing.- White foam board — adds soft fill, brightens shadows without altering colour
- Silver reflector — intensifies light, great for dramatic metallic cake decorations
- Dark V-flat — subtracts light, adds shadow contrast for bold editorial looks
- Gold reflector — adds warm tones, suits rustic naked cakes and autumnal styling
"The right light, the right angle, the right moment — that's when a cake stops being a cake and becomes a memory you can taste."
Styling and Framing: How to Make Cake Photos That Look Amazing
Even perfect light can't rescue a chaotic background. The surface and backdrop you choose either amplify your cake or compete with it — and when props fight the subject, the cake always loses. Neutral surfaces such as marble, raw timber, or slate allow frosting colours to pop without visual noise. A soft grey or warm white backdrop works universally. Avoid busy patterns or bright colours that pull the eye away from the centrepiece. Plates, forks and linen napkins should quietly support the cake's story, not demand a starring role of their own.Choosing Props That Actually Belong
Props earn their place only when they genuinely relate to the cake. Fresh berries, lemon slices, or a sprig of mint look purposeful beside a cake that contains those ingredients — not as generic garnish theatre pasted on for aesthetics.- A single slice on a plate with a fork tells a human story about texture and portion
- Edible flowers and fresh toppings look their best placed seconds before you shoot — they wilt fast
- A dusting of icing sugar or fine sprinkles catches light and adds dimension just before the shutter fires
- Vintage silverware or dark ceramics pair well with bold, dramatic cake designs
- Simple white dishware suits delicate pastel or buttercream styles
Shooting Angles: What Each One Says About Your Cake
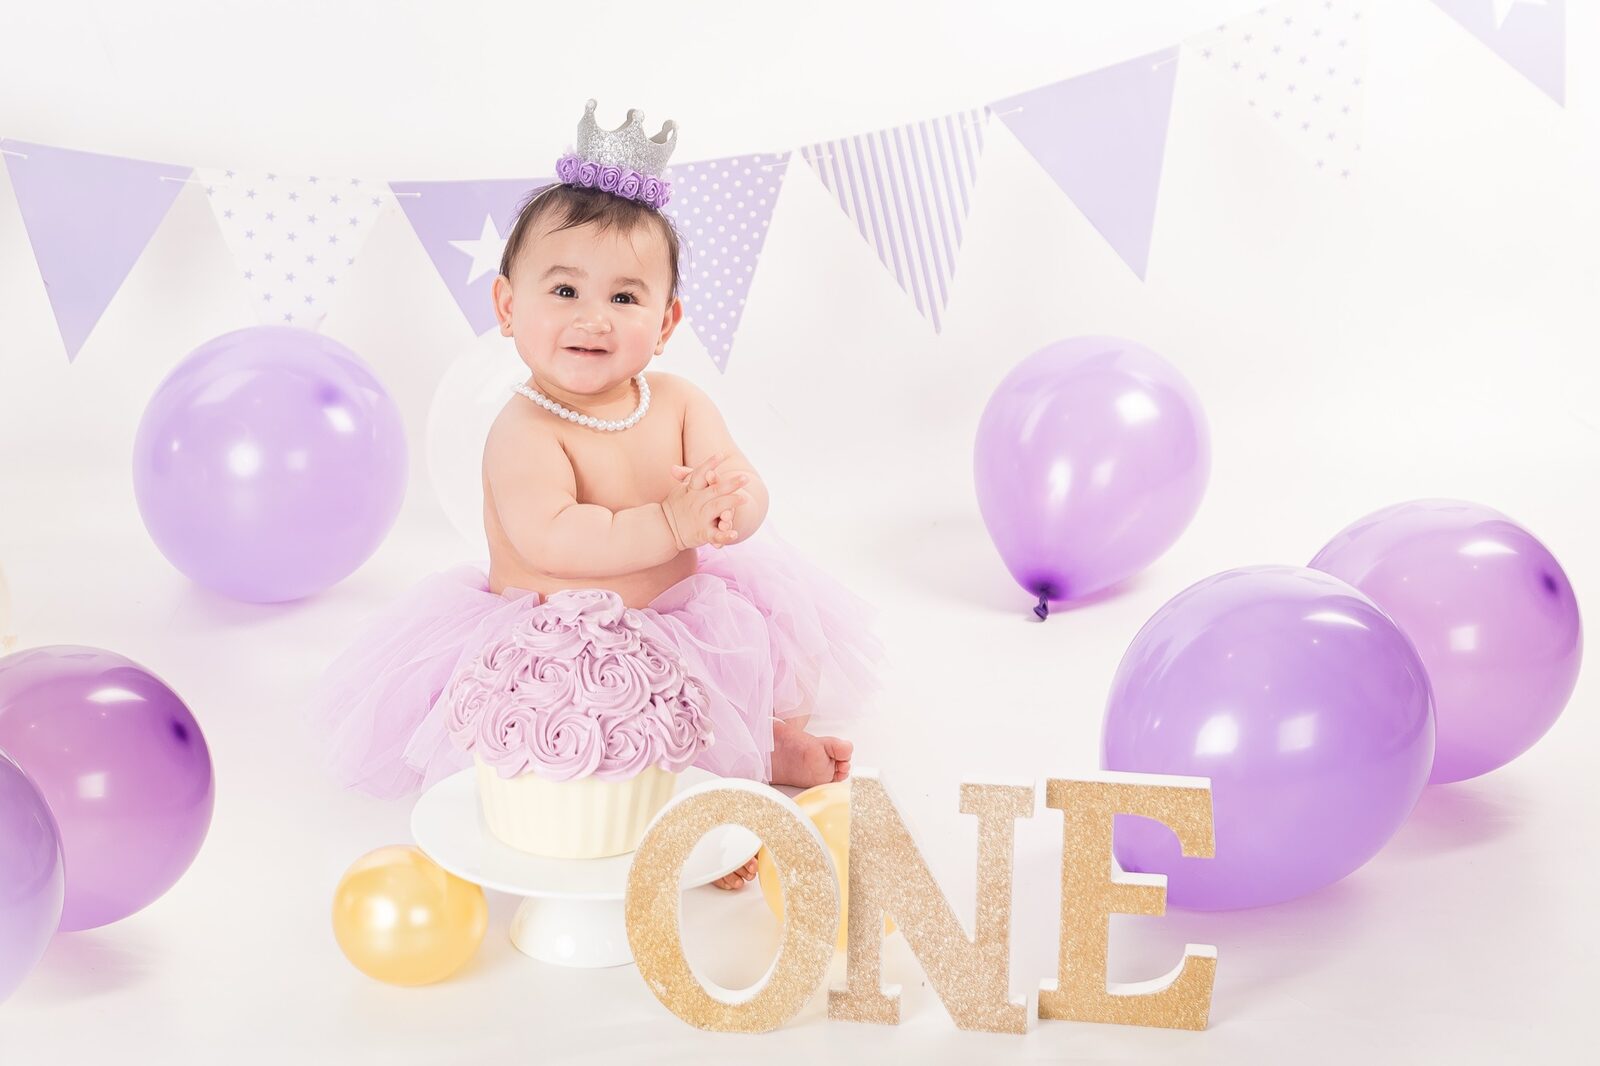
Angle is storytelling. Straight-on (eye-level) shots emphasise layers, height, and side decorations — ideal for towering tiered cakes. A 45-degree angle is the most universally flattering: it shows the top, the sides, and any garnish all at once. Overhead (flat lay) shots work beautifully for naked cakes, single-tier designs, and dessert spreads, letting patterns and texture take centre stage. For cake smash photography in Sydney, angles shift entirely — you're chasing the child's face, not the cake itself, so staying low and shooting at the baby's level captures the authentic wonder and delight that parents treasure forever. Our studio sessions at Gledswood Hills and Glen Alpine are designed with exactly that perspective in mind.Ready to Create Cake Photos Worth Keeping Forever?
At Faithful Photography, our South-West Sydney studios are purpose-built to make every detail — from frosting texture to your little one's first messy bite — look extraordinary.
Camera Settings for Cake Photography That Wows
Even the best styling falls flat if your camera settings aren't working with you. Understanding a handful of core settings makes the difference between a technically sharp image and one that genuinely makes mouths water.- Aperture: Shoot between f/2.8 and f/5.6 to create a shallow depth of field that separates the cake from the background with a soft, creamy blur.
- ISO: Keep ISO as low as possible (100–400) to avoid digital grain that makes frosting look gritty rather than silky.
- Shutter speed: With natural light, 1/100s or faster avoids camera shake; with a flash, sync to 1/160s or as specified by your unit.
- White balance: Set manually — auto white balance can shift between frames and make icing change colour between shots, which creates a nightmare in post-production.
- Focus point: Lock focus on the most intricate decoration on the cake's front face so the detail that defines the design is always tack-sharp.
Cake Smash Sessions: When Cake Photos Become Something More
Cake smash photography sits at a unique crossroads between food photography and portraiture. Yes, you want the cake to look beautiful before the session begins — and our team at Faithful Photography puts genuine thought into designing the studio setup to complement the cake's colours and style. But the moment your little one reaches in with both fists, the camera pivots entirely to emotion. The result is a set of images that does two things at once: documents a beautifully styled dessert *and* captures a child's pure, unfiltered joy. It's one of the most requested sessions we offer across the Macarthur region — from Camden, NSW to Campbelltown and Narellan. Thinking about what your little one will wear? Our guide on cake smash outfit ideas covers everything from tutus to rompers, with colour-matching tips that photograph beautifully against almost any cake palette. You can also browse our full session pricing to understand what's included in a cake smash package.Common Mistakes That Ruin Cake Photos (and How to Fix Them)
Even well-intentioned photographers make the same avoidable errors. Knowing what to watch for will save you from binning a whole card of otherwise good images.- Shooting in mixed light: Combining window light with a warm overhead bulb creates a two-toned colour cast that's extremely difficult to correct. Turn off overhead lights and commit to one source.
- Too much depth of field: Stopping down to f/11 keeps backgrounds sharp — but those backgrounds are then competing with the cake. Open up your aperture.
- Forgetting the back of the cake: Rotate the cake before each shoot to check whether the most photogenic side is facing your lens.
- Shooting too high: Most cakes look best from eye level or slightly below, not from above. Drop your camera position and reshoot.
- Overcrowded props: More is rarely more in cake photography. Edit props ruthlessly — one or two supporting elements, maximum.
Frequently Asked Questions
What makes cake photos look amazing without professional equipment?
The single biggest upgrade you can make without spending a cent is moving to a window with indirect natural light. Place the cake close to the glass, turn off all artificial overhead lights, and use a white piece of cardboard opposite the window to bounce light back into the shadows. Pair that with a clean, neutral background — a sheet of white craft paper or a timber chopping board — and you'll see an immediate improvement in your results.
What angle is best for photographing a layered cake?
A 45-degree angle is the most flattering for the majority of layered cakes — it shows both the height of the layers and the decoration on top in a single frame. Straight-on eye-level shots work well when the side design is the feature. Reserve the flat-lay overhead angle for single-tier designs, slices, or dessert table spreads where the top of the cake has the most visual interest.
How does a professional cake smash photographer approach the session differently to a DIY photo?
A professional handles every technical variable — lighting ratio, background selection, camera settings, and studio environment — before the session begins, so there's nothing to troubleshoot once the baby is in front of the camera. All the energy goes into reading the child's cues and capturing genuine emotional moments. A DIY setup often means the parent is simultaneously managing the camera, the light, and a one-year-old covered in frosting, which makes for a stressful experience and inconsistent results.
Do you offer cake smash photography in the Campbelltown and Camden area?
Yes — Faithful Photography operates studios in Glen Alpine and Gledswood Hills, placing us right in the heart of South-West Sydney and the Macarthur region. We regularly welcome families from Campbelltown, Camden, Narellan, Gregory Hills, Oran Park and the surrounding suburbs. Our cake smash photography packages are designed to create a joyful, stress-free experience for both parents and little ones.
How long before my baby's birthday should I book a cake smash session?
We recommend booking at least six to eight weeks in advance, especially if your little one's birthday falls during a peak period like school holidays or the lead-up to Christmas. Weekend slots in particular fill quickly. You can check current availability and book a session online, or reach out to our team directly if you have questions about timing or what the session includes.
Can I see examples of your cake smash studio setups before booking?
Absolutely. Our blog covers cake smash studio design in detail, including how we match backdrop colours, props and cake palette to create a cohesive, visually stunning set. You're also welcome to browse our gallery or follow our social channels to see recent sessions before making a decision.
Visit Faithful Photography Today
Serving families across South-West Sydney from our studios in Glen Alpine and Gledswood Hills — we'd love to help you capture a milestone that deserves more than a phone snap. Whether it's your baby's first cake smash, a family portrait, or a maternity session, our team is ready when you are.