Key Takeaways
- Your smartphone and natural window light are genuinely all you need to create beautiful pregnancy photos at home — technique matters far more than expensive gear.
- Small posing adjustments (the 45-degree angle, relaxed hands, chin slightly down) make an enormous difference to how flattering and authentic your images look.
- When DIY isn't enough, a professional maternity photography session with Faithful Photography captures the emotion, light and detail that truly do justice to this season of life.
Essential Equipment for Home Pregnancy Photography
Your Camera Doesn't Need to Cost a Fortune
Here's something that surprises most people: a modern smartphone is genuinely capable of producing stunning maternity images. The iPhone 15 Pro and Samsung Galaxy S24 Ultra, for instance, shoot in formats and resolutions that rival entry-level DSLRs in good light. Switch to Portrait Mode to activate the depth effect that blurs the background and draws attention to your bump. Tap the screen to set focus on your face or belly, then drag the exposure slider until the light looks natural — not blown out, not muddy.- A budget tripod (under $25 from any electronics retailer) keeps shots sharp and frees you from relying on someone else to hold the phone.
- A Bluetooth shutter remote means you can trigger the shot yourself without the 10-second timer scramble.
- If you do own a DSLR or mirrorless camera, shoot at a wider aperture (f/1.8–f/2.8) to separate your subject from the background beautifully.
Mastering Your Home Lighting Setup
Natural window light is the single most powerful tool in home maternity photography. Position yourself perpendicular to the window — not facing it head-on, which creates flat, raccoon-eye shadows, but at a 45-degree angle so the light wraps softly around your face and belly. Overcast days are genuinely ideal. Clouds diffuse direct sunlight into a broad, even source that flatters skin tones and eliminates harsh shadows. Don't wait for golden hour if you're indoors; mid-morning or mid-afternoon soft light through a north or east-facing window is often perfect. If your home lacks great natural light, a simple LED panel (around $30–$50 from most camera retailers) positioned at a 45-degree angle to your left gives you predictable, flattering illumination. Avoid ring lights for maternity work — they create a circular catchlight that can look harsh and clinical in close-up shots. For a deeper dive into studio-quality lighting principles you can adapt at home, our guide to lighting equipment studio essentials is worth bookmarking. ---Props and Backdrops That Actually Elevate Your Home Shoot
You don't need to spend much. The most effective props are almost always the simplest.- White or cream bedsheets draped over a plain wall or bed frame create a clean, timeless backdrop for next to nothing.
- Fresh flowers from your local supermarket — eucalyptus, white roses, baby's breath — add texture and a sense of occasion without looking contrived.
- Personal items like ultrasound scans, baby shoes or a hand-knitted blanket tell your specific story in a way generic studio props never can.
- A plain white or warm neutral wall is often your best backdrop. Clear the surrounding clutter before you shoot — visual distractions steal focus from what matters.
What to Avoid
Milk baths are a popular trend on social media, but they're genuinely difficult to execute well without professional lighting, a second shooter and a very willing partner to handle the aftermath. If you're drawn to that aesthetic, it's worth discussing with a professional — our maternity photography sessions in South-West Sydney can include styled setups like this in a controlled environment. For wardrobe, coordinate colours rather than matching outfits exactly. A navy top paired with light blue tones from your partner reads elegantly in photos; identical outfits can look stiff. Our family portrait wardrobe tips cover this in detail if you're planning to include your partner or children. ---How to Pose for Stunning Pregnancy Photos
Posing is where most DIY maternity shoots either shine or fall flat. A few small adjustments — the kind a professional would guide you through in a session — make an extraordinary difference to how flattering and authentic the final images look.Body Positioning That Flatters Your Silhouette
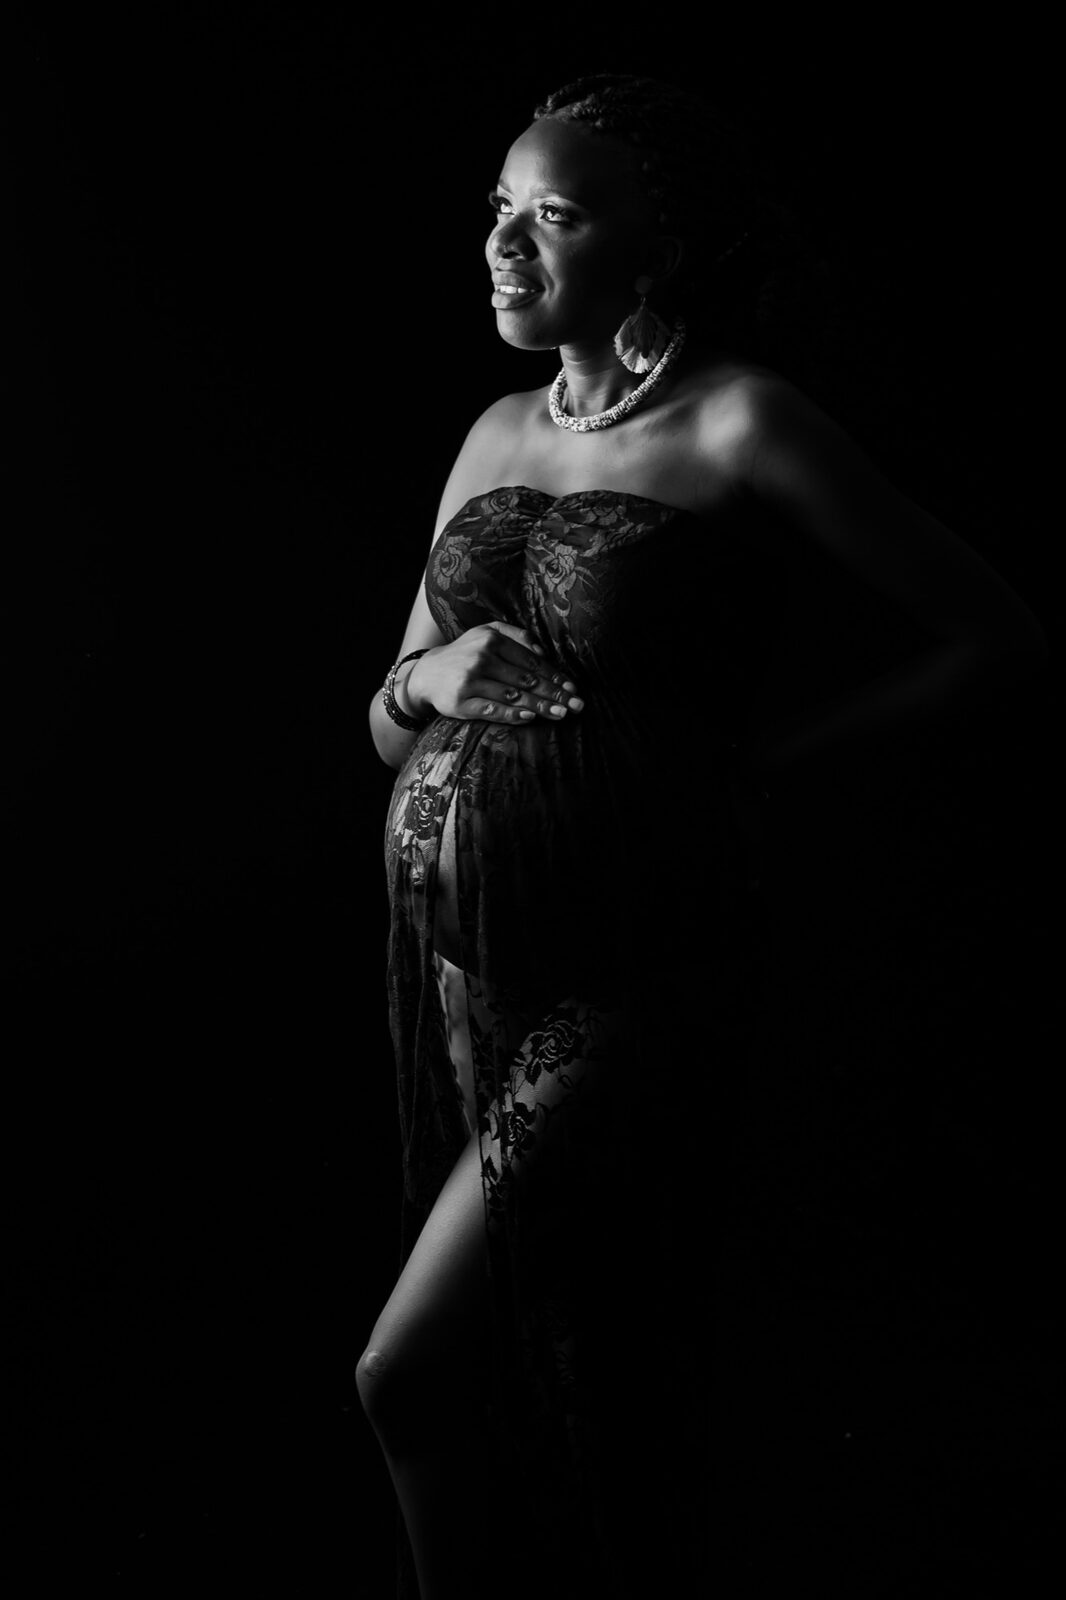
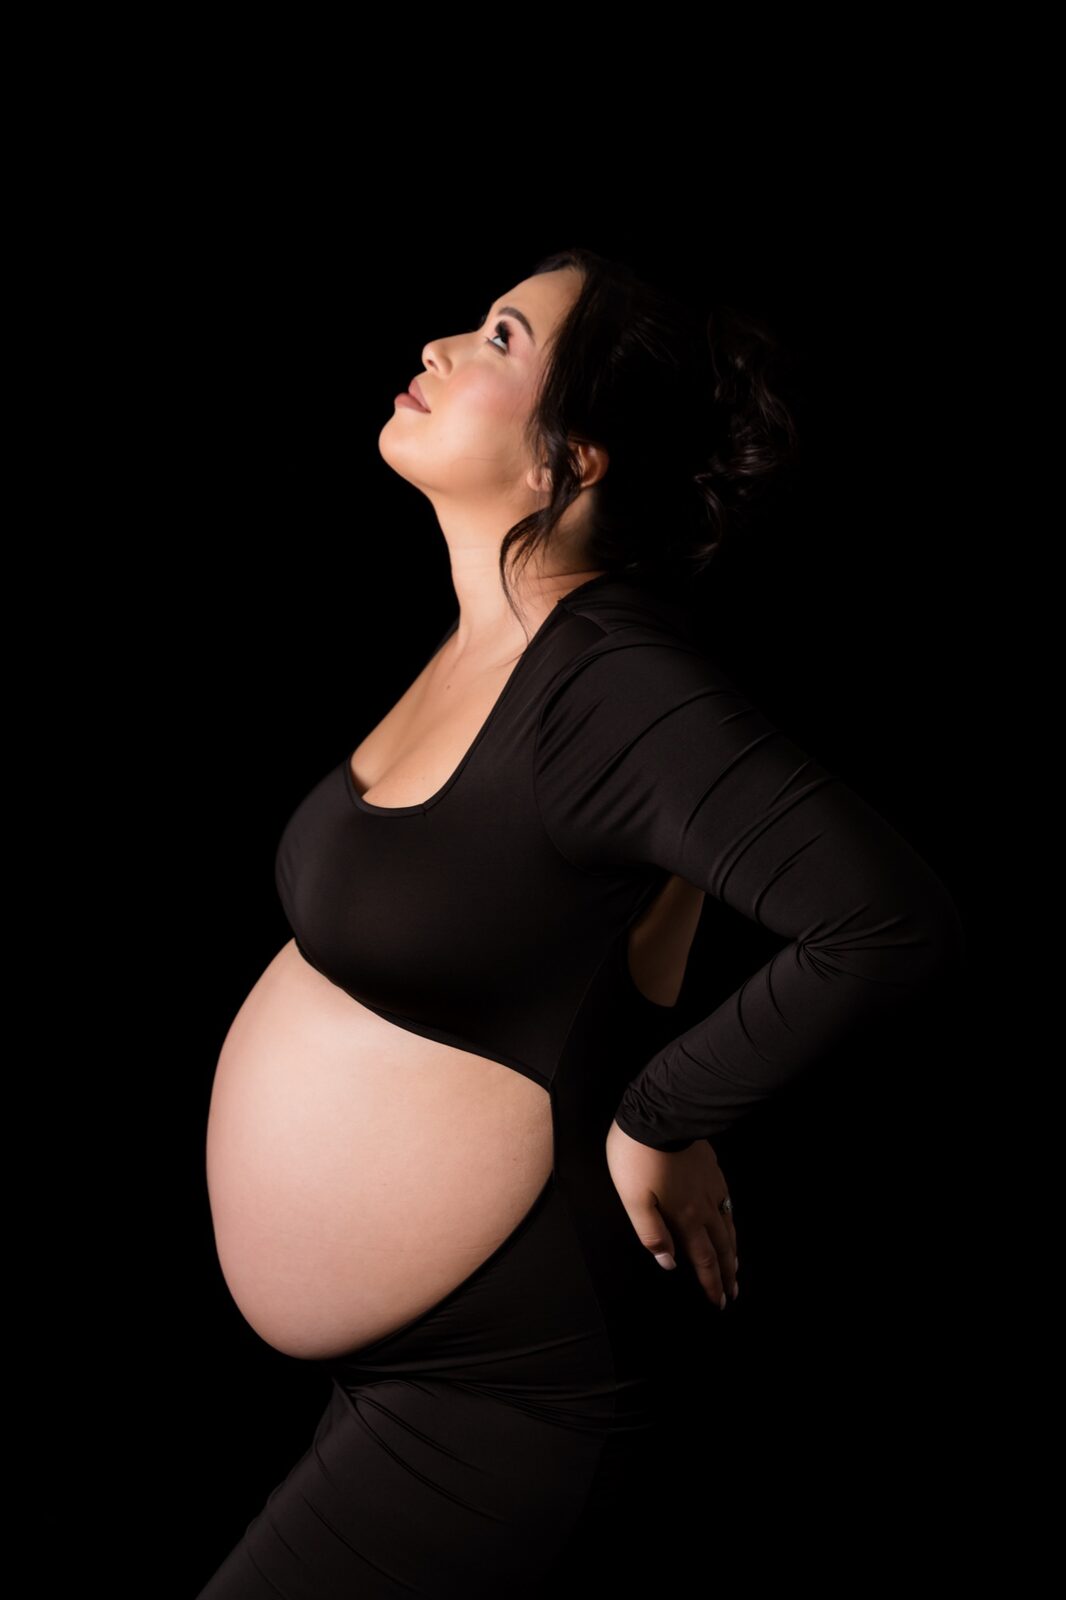
The 45-degree angle is your best friend. Stand at a diagonal to the camera with your back leg slightly bent. This single adjustment creates a flattering, dimensional silhouette instead of a flat, wide-on-the-camera appearance. Keep your arms slightly away from your body. This prevents them from merging visually with your torso and losing shape in the frame. Place one hand gently beneath your bump — not resting on top, which can create downward shadow — and the other can rest naturally at your side or hold a prop. Pull your shoulders back, lift through your chest, and bring your chin slightly down and forward. It sounds like a lot to think about, but once you feel it, it's immediately natural. This combination elongates the neck and gives a sense of quiet confidence that reads beautifully on camera.Including Your Partner and Children
- Stand in front of your partner with their arms wrapping around you from behind, hands resting gently on the bump — this creates depth and connection without competing for attention.
- Avoid standing side-by-side facing the camera; it flattens both of you and removes the sense of intimacy.
- If including children, have them sit or kneel at belly height. Their eye contact with the bump creates genuinely magical, emotionally resonant images.
- Let candid moments happen: a partner whispering something, a toddler pressing their ear to the bump. These in-between moments are often the keepers.
Camera Angles That Make the Difference
Shoot from eye level or very slightly above — angles from below are unflattering for virtually everyone. Position the camera at belly-button height specifically for bump-centred shots so proportions read correctly. Crop at the narrowest point of the body (usually the lower thigh or knee) rather than at the widest. This simple framing trick creates a visually slimmer, longer impression. Mix up still poses with gentle movement: walking slowly, running fingers through your hair, or looking down at your belly all produce images that feel alive rather than stiff."The most breathtaking maternity images aren't about perfect lighting or a flawless pose — they're about a real woman, in a real moment, owning the most extraordinary chapter of her life."---
Where to Set Up Your Home Shoot for the Best Results
The Best Rooms in Your Home
The bedroom is the classic choice — soft bedding, intimate atmosphere, and usually a good-sized window. Make the bed with your nicest linen, clear away bedside clutter, and let the morning light do the rest. The nursery, if it's ready, is full of emotional resonance. Photographing a mum cradling her bump in the room she's prepared for her baby is one of the most quietly powerful setups available to you at home. Doorframes and hallways offer natural framing — standing in a doorway with light pouring in from outside creates a beautifully composed, architectural shot without any additional setup.Preparing Your Space
- Declutter the background area thoroughly — even items that seem small in person become distracting in a photograph.
- Remove colourful objects that might cast unwanted colour reflections onto skin (bright red walls, for instance, can tinge everything warm).
- Test your chosen spot at the time of day you plan to shoot — light changes dramatically between morning and afternoon.
- Have your wardrobe, props and hair ready before you start shooting so the session feels relaxed rather than rushed.
Ready to Capture Something Truly Unforgettable?
Faithful Photography specialises in maternity portraits that honour this fleeting, luminous season. Serving families across Campbelltown, Camden, Narellan and all of South-West Sydney from our studios in Glen Alpine and Gledswood Hills.
Outfits and Styling That Photograph Beautifully
What you wear makes a significant difference to how your images read — both in the moment and for years to come.What Works Well
- Form-fitting fabrics — jersey, ribbed knit, stretchy lace — celebrate the shape of your bump rather than obscuring it.
- Neutral and muted tones (cream, blush, sage, white, soft terracotta) tend to feel timeless and complement most home environments.
- Flowy maxi dresses photograph especially well outdoors or in front of a window, where light can filter through the fabric.
- For a more editorial feel, a simple fitted singlet or bralette paired with loose linen trousers creates a clean, modern aesthetic.
Hair and Makeup for a Home Shoot
You don't need a full glam team, but a little intentional preparation makes a difference. Keep makeup slightly more polished than your everyday look — the camera softens intensity, so what feels "a bit much" in the mirror often reads as perfectly natural on screen. If you'd like professional help, our hair and makeup services are available as an add-on to any maternity session, and our artists are experienced at creating looks that feel authentic rather than overdone. For inspiration on how other clients have approached their maternity styling, our maternity portrait session ideas guide is full of practical examples. ---When a DIY Shoot Isn't Quite Enough
Home maternity photography is a wonderful way to capture everyday intimacy — but there are moments in life that deserve more than a smartphone and a good window. Professional maternity photography brings the kind of light control, posing guidance and artistic direction that genuinely elevates an image from nice to extraordinary. At Faithful Photography, our maternity photography sessions are designed around you. We take the time to understand your story, your aesthetic, and what this pregnancy means to your family before we even pick up a camera. Our studios in Glen Alpine and Gledswood Hills are fitted with professional lighting rigs, a curated wardrobe selection, and all the styling props you could need — but we can also come to you. We work with families across the Macarthur region, including Campbelltown, Camden, Narellan and surrounding suburbs. If you're based in Gledswood Hills or Glen Alpine, you're literally on our doorstep. View our session pricing or, if you'd like to gift a session to someone special, our gift vouchers make a thoughtful and lasting present. ---Frequently Asked Questions
How do you create beautiful pregnancy photos at home without professional equipment?
Start with natural window light — position yourself at a 45-degree angle to a large window on an overcast day for the softest, most flattering results. Use your smartphone in Portrait Mode with a budget tripod, and choose a clutter-free background like a plain wall or white bedsheet. Simple props like fresh flowers and personal items (ultrasound scans, baby shoes) add meaning without looking staged. The biggest upgrade isn't equipment — it's posing: shoulders back, chin slightly forward and down, hands relaxed on the bump.
What is the best time during pregnancy to take photos at home?
Most photographers recommend the 28–34 week window as the sweet spot. Your bump is beautifully rounded and clearly visible, but you'll still feel comfortable enough to move, pose and enjoy the experience. After 35 weeks, physical fatigue and the logistics of getting comfortable on the ground or in certain poses can become genuinely challenging. That said, every pregnancy is different — book or plan your shoot when your body feels ready.
What should I wear for pregnancy photos at home?
Form-fitting fabrics that celebrate your bump — jersey, ribbed knit, stretchy lace — photograph far better than loose or boxy clothing, which can obscure the shape you're celebrating. Neutral tones (cream, white, blush, sage) tend to feel timeless and work well against most home backgrounds. Flowy maxi dresses are a popular choice, especially near a window where light can filter through the fabric. Avoid busy patterns or very bright colours, which compete with your face and bump for visual attention.
How do I pose for pregnancy photos to make my bump look its best?
Stand at a 45-degree angle to the camera with your back leg slightly bent — this creates a flattering, dimensional silhouette. Pull your shoulders back, lift through your chest, and bring your chin slightly down and forward to elongate the neck. Place one hand gently beneath your bump (not resting on top, which creates shadow). Keep your arms slightly away from your body to avoid them merging visually with your torso. For camera height, shoot at belly-button level for bump-centred shots to capture true proportions.
Does Faithful Photography offer maternity sessions outside the studio?
Yes. While our studios in Glen Alpine and Gledswood Hills are fully equipped for professional maternity photography, we also work with clients at home and at outdoor locations across the Macarthur region, including Campbelltown, Camden, Narellan, Oran Park and surrounding suburbs. If you'd prefer the intimacy of your own environment paired with professional direction and lighting, get in touch to discuss your options.
What's the difference between DIY maternity photos and a professional session?
DIY maternity photos can be genuinely beautiful, especially for capturing everyday intimacy at home. The key limitations are consistent lighting control, confident posing guidance and the emotional ease that comes from being directed by an experienced photographer. A professional session means you don't have to think — you can simply be present in the moment while the technical and compositional work is handled for you. The resulting images tend to have a polish, depth and emotional clarity that's difficult to replicate alone.
Visit Faithful Photography Today
Whether you're inspired to create beautiful pregnancy photos at home or ready to experience a fully guided professional maternity session, our team is here for you. Faithful Photography serves families across South-West Sydney and the Macarthur region from our studios in Glen Alpine and Gledswood Hills — award-winning photography delivered with warmth, care and a genuine love for this craft.